Monday 8 July 2013

Priceline Haul + 1/2 Price Rimmel + Apocalips Have Landed!

Hi everyone! Sorry I've been neglecting my blog for the past couple of weeks, I've been busy with wedding organisation, my uni project and just life in general. I've also been on a no buy for about 4 weeks now so I haven't had anything new and exciting to get me motivated. The no buy was shattered however in spectacular fashion last Thursday when I went on a shopping spree at Priceline. I'd had a crappy week, including our house getting broken into, so I asked the fiance nicely and he said "Go ahead, TREAT YO' SELF". Lol, not really! But he did let me run a little wild at Priceline to make me feel better. And heads up Australian beauty junkies - Priceline has the entire Rimmel London range half price for this week AND the much talked-about Rimmel Apocalips have arrived on our shores!

They're finally here!

I bought six out of the total eight shades available - Nude Eclipse, Solstice, Celestial, Nova, Stellar and Apocaliptic. With the half price sale they were $8 each, so now is a great time to grab some if you wanted to try them out. I'll have a review and swatches coming soon on these six shades, but so far I'm pretty impressed. You might have also noticed that Priceline has started putting sticky tape on their cosmetics that aren't already safety sealed, which can be a pain to get off and leaves a mess behind, but it is very reassuring to know that other people haven't used the products you're buying!

L-R: Apocaliptic, Stellar, Nova, Celestial, Solstice, Nude Eclipse

I already own a couple of the Rimmel Lasting Finish Lipsticks and really like them, so I bought 8 more as they were $5 each with the sale! A little excessive, but a girl can never have too many lipsticks, right?


L-R: Cutting Edge, Temptation, Alarm, Heart Breaker, Firecracker, Coral in Gold, Asia, Undressed

I also bought some more Rimmel stuff on sale, three out of the four new Maybelline Colour Tattoo Metal Eyeshadows and one of the new Maybelline Color Show Sequins nail polishes. Unfortunately none of the Maybelline products were on sale but I was so excited to see these new shades that I had to get them!


Metal Rush Nail Polish in 60 Royal Blue, Match Perfection Blush in Light/Medium, Scandaleyes Flex Mascara in Black, Glam'Eyes Mono Eyeshadow in Punchy Taupe, Lasting Finish Soft Colour Blush in Geniune Plum
Colour Show Sequins nail polish in Rose Bling, Colour Tattoo Metal Eyeshadows in Inked in Pink, Barely Branded and Silver Strike
I also didn't realise that Max Factor Fantasy Fire is still part of Max Factor's core mini nail polish range here in Australia until I read it on another beauty blog recently (I can't remember which one, sorry!) so I've been keeping an eye out for it and found some in stock at my local Priceline. I'm pretty stoked that it's still so widely available here as I was under the impression that it's now hard to find? Either way, it's soo pretty!

Oooooh!

And that's it for my mega haul! It definitely cheered me up having so many new pretties to play with and I'll try to get some reviews and swatches out soon. Has anyone else been on a shopping spree lately?

x


Tuesday 18 June 2013

C'arn the Socceroos!

Photo credit: Socceroo's facebook page

In less than an hour, Australia will begin their last qualifying match for the 2014 FIFA World Cup! With a decided victory over Jordan last week, a frustrating draw against Japan the week before, and another draw with Oman way back in March, Australia is facing the remaining team in their qualifying group tonight - Iraq. If Australia wins this match, they will be going through to the World Cup next year! If not, they still have a chance, but I'm definitely gunning for a win tonight!

Indoors, with flash
For the iconic green and gold, I alternated between China Glaze Happy Go Lucky and China Glaze Gaga For Green. The soccerball was done freehand with a nail art brush using L.A. Girl minis in black and white. I just received KB Shimmer Clearly On Top top coat in the mail today and had to try it out - it worked great over this mani, and didn't smudge the soccerball. The prop in these pictures is one of my brother's soccer trophies from when he used to play in the local team as a kid.

Outdoors, natural light
Also, the Australian team name, the Socceroos, is a portmanteau! Love it! And so Aussie, mixing 'soccer' (the name that us Australians use for the world game, because we're special and call our own strange Australian game 'football') and 'roos' (a shortening of 'kangaroos', our iconic hopping marsupials).

A rare right hand appearance
And now I better high-tail it over to my fiancé's place to watch the game! 
Aussie Aussie Aussie! Oy Oy Oy!

x


Monday 17 June 2013

Paw Print Stamping

My second ever go at stamping, inspired by my pup. He is almost 16 and has Cushing's syndrome, but he is still making the best of it!

Bomber (named for an AFL team)

This attempt went much better than my first, which was completely unrecognisable, but I still have a long way to go. Still, it was so much fun, and quick and easy compared to freehand nail art. So far I've found that the trick is finding the right polish to stamp with, and working quickly.

Indoors
I started of with two coats of OPI My Vampire Is Buff, a beautiful cream colour whose application was a bit streaky. I then stamped on the paw prints using Bundle Monster BM-323 with Wet N Wild Black Creme, which turned out to be a great polish for stamping, although it could have been a bit more pigmented. My top coat also caused the paw prints to smudge, maybe I needed to wait longer before applying it?

A close up of my middle finger

Obviously I'm late to the party here, and my application leaves a lot to be desired, but I'm sure I'll be doing lots of practice now that I've got the stamping bug. Stamp all the things! 

x

Wednesday 12 June 2013

Emily de Molly - Dark Forces

Woo! Emily de Molly! As an early Aussie supporter of Emily de Molly polishes, I've been thrilled to see Hayley's creations skyrocket to international fame over the past few months. The development of the brand has really been something to see - the complexity of the polishes, the ever-improving formulas, the adventurous colour combinations, not to mention the new range of linear holographics!


Sunlight


Dark Forces is a black jelly filled with large silver holographic circles, small and medium silver holographic hexes, and small iridescent glitters. I used two coats over black, but the base is opaque enough for it to be built up in two or three coats on its own, which would give it an even greater depth. I layered it over black as I wasn't sure how sheer it would be - next time I'm definitely wearing it on its own!


Sunlight

Application was fantastic -  I was painting my nails in dim lighting whilst lying on my bed (usually a recipe for streaky polish and messy cuticles) and it came out almost perfect! A miracle, considering I'm nowhere near the world's best manicurist. I used one thick coat of Cult Nails Wicked Fast top coat (I'm getting near the end of my bottle so it's thickened up somewhat) and the end result was much more glossy than it looks in these photos  - I put hand cream on not long before taking these pictures and it left some residue on my nails.


Sunlight
I didn't have any trouble getting the large circles out and onto the brush, but I did stand my bottle upside down for a couple of minutes before application. I had to place a few of the large circles where I wanted them, as they were reluctant to come off the brush straight away, but most were very well-behaved. If your nails are quite curved like mine, you might want to avoid placing the large circles right in the centre of the nail, as they wont sit flush with the curve of the nail but will remain flat with their edges poking out slightly. I mainly had this problem on my pinky nails, but with a thick coat of topcoat it was hardly noticeable.


I took some photos inside with flash to show how wonderfully holographic the glitters are - the sunlight pictures don't really do them justice. The blurry picture gives a better idea of the beautiful holographic flashes that happen as the glitters catch the light. I found myself moving my fingers around to see the pretty rainbows (weirdo!) and the iridescent glitters also add to this effect.


Close up! Love those large circles!
So, what do you guys think? Perhaps not the most original polish to ever strike the indie world but I absolutely love it! Black, silver, holographic - it's a classic and a statement all at once! 

You can buy Emily de Molly polishes via etsy, bigcartel or Femme Fatale if you live in Australia, otherwise check out the list of international distributors here.

x

Tuesday 4 June 2013

Breaking News! Milani Limited Edition Naturally Chic Shadow Eyez Pencils Now Available At Cherry Culture!

Heads up international beauties! I have been stalking Cherry Culture for the past couple of weeks to see if they would be stocking the new limited edition Milani Naturally Chic Shadow Eyez pencils and they are finally available right here!


Photo credit: milanicosmetics.com

If you haven't heard of these new limited edition shades of Milani's Shadow Eyez pencils... have you been hiding under a rock?? No seriously, check out these great reviews by some of my favourite bloggers Nouveau Cheap and Vampy Varnish. Until now, these pencils have only been available in the US so if you're international like me I would hurry up and grab some from Cherry Culture because they are sure to sell out!

Will you be snapping these up? Do you think Milani should make these permanent additions? I've already hauled every shade plus backups!

x

Monday 3 June 2013

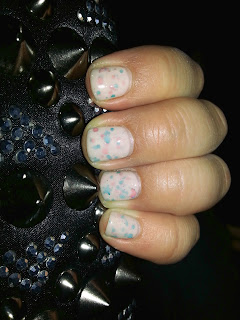
NOTD: A Rose Water Sandwich

On Friday night the fiancé and I went out to a NUGAS (National Union of Greek Australian Students) event and although the cover charge was ridiculous and the bar was tiny, the Greek DJ was great and my nails made me happy! 

My Nails Of The Day (well, Night) with my favourite studded clutch

This look was a crelly sandwich - my first successful one ever! Australis Satine was the bread of my sandwich, with one coat on the bottom and two coats on top. It's a very sheer off-white crelly and applied quite streaky so it probably wouldn't work very well on it's own. The glitter was Rose Water by Candy Lacquer, an indie polish maker who makes stunning glitter bombs. I have so many of her polishes I think I need to go to Candy Lacquer rehab! Rose Water is bright pink and aqua holo glitter in many different shapes, including some larger stars, moons and butterflies. I bought the polish mostly because of the name (rosewater is one of my favourite scents), but I really liked the way it looked under Satine - it subdued the metallic brightness of it and helped to smooth out the larger glitter. Sorry that there isn't a better picture of this manicure, I didn't take any close up pictures because every single nail ended up with bubbles. I think it was because of the Sally Hansen Ultra-Wear Top Coat I used - this was my first time trying it and the dry time was sloooooow.

What do you guys think? Have you ever tried doing a jelly or crelly sandwich? I'm loving them and can see many more coming up in my future!

x

Friday 31 May 2013

LA Girl - Sandstorm

My first real post, how exciting!!

Today I have on my blog one of the LA Girl textured polishes, from a collection they've called 'Sand Blast'. If you haven't heard of LA Girl, they're a budget beauty brand from the US, which us Australians can purchase from Cherry Culture or Beauty Joint for between $2.50 and $6 a bottle. The shipping is fairly reasonable from both these sites too. I've never tried any of LA Girl's makeup but I have a whole bunch of their nail polishes and I've been really impressed with them, especially for the price point! I particularly loved their Rock Star and Glitter Addict collections, which are currently on sale at Cherry Culture. 


LA Girl Sandstorm (sunlight)

Now, on to this textured polish thing. I am really loving the textured trend at the moment, and LA Girl's take on this is similar to Milani and China Glaze's - that is, a matte textured look, as opposed to the sparkly versions by OPI and Zoya. I am in love with the OPI and Zoya offerings, particularly OPI's Bond Girl collection and Zoya's original Pixie Dust collection, and I wasn't really sold on the matte versions by other brands, as I thought they looked like something a primary school kid would come up with in art class, but I picked up some Milani and LA Girl just to try them and I'm so glad that I did! I'm not sure I could handle China Glaze's super bright summery ones and some of Milani's more in-your-face ones (like bright yellow!), particularly as it's going into winter here, so I picked up the grey, purple and red Milani textured creams and the green, blue, brown/taupe and orange/coral LA Girl Sand Blasts. I'll try and get some reviews/swatches of these up soon, especially of the LA Girl ones, as when I searched for swatches and reviews before I purchased them, I could hardly find anything!


LA Girl Sandstorm - 2 coats (sunlight)

I'm on a real neutral kick lately so my first choice in trying these out was LA Girl Sandstorm - a beautiful neutral tan colour that makes me think of café au lait. In terms of texture, I have found it to be slightly more subtle than the Milani textured creams, in that the size of the grit seems slightly smaller.  I only applied two coats for the photo below, which covered well, but when the light hit my nails from underneath you could see some definite patchiness, so you could get away with two coats on short nails like mine, but fuller coverage or longer nails would probably require three. Application was great, you just have to make sure the previous coat has dried completely before applying the next so you don't end up dragging the gritty bits from the previous coat along the nail. I have to admit, one reason why I'm loving this textured nail trend so much is that it's so forgiving! I struggle with applying creams sometimes because I end up with streaks and want to fix them straight away but only end up making them worse but the texture of these polishes hide the minor imperfections that normally drive me crazy! I also love the lack of need for a top coat - just a base coat, a couple of coats of polish and I'm done! It's so fast and easy and I find that skipping on extra layers and topcoat allows the polish to last much longer than it usually does on me because it doesn't start lifting and I'm much less tempted to pick at it. Dry time was also very good with this polish. It lasted two days on me before it chipped, which may not sound like much, but I was abusing my nails terribly during this time and it held up much better than say, a cream polish would.

In short, I absolutely recommend this polish! It's cheap (although not that easily available for us internationals) and is a great way to try out the textured polish trend if you think that you wouldn't be able to pull off the bright or super glittery shades, such as in an office environment.

Thanks for reading! Please leave a comment if you want to see a review/swatch of any of the other shades I mentioned or just to let me know that someone out there has seen my fledgling blog!

x